
Woodwork Painting Preparation.
Proper woodwork painting preparation forms the foundation of any successful decorating project. Whether you’re refreshing skirting boards, doors, architrave, window frames, or bannisters, thorough preparation ensures your paint adheres correctly and delivers a professional-looking finish that stands the test of time.
Many homeowners underestimate the importance of meticulous surface preparation, often rushing straight to the painting stage. However, skipping essential preparation steps frequently leads to peeling paint, uneven coverage, and disappointing results that require costly remedial work. What specific preparation techniques will guarantee your woodwork painting project achieves the flawless finish you desire?
Key Takeaways
- Proper cleaning with sugar soap removes grease and contamination before sanding begins
- Strategic repair work using appropriate fillers creates smooth, uniform surfaces
- Systematic sanding progression from coarse to fine grits ensures optimal paint adhesion
- Comprehensive surface preparation prevents common woodwork painting preparation failures
- Professional priming techniques seal bare wood and ensure consistent paint coverage
- Quality tools and materials significantly impact final results and project longevity
Essential Tools and Materials
Gathering Professional Equipment
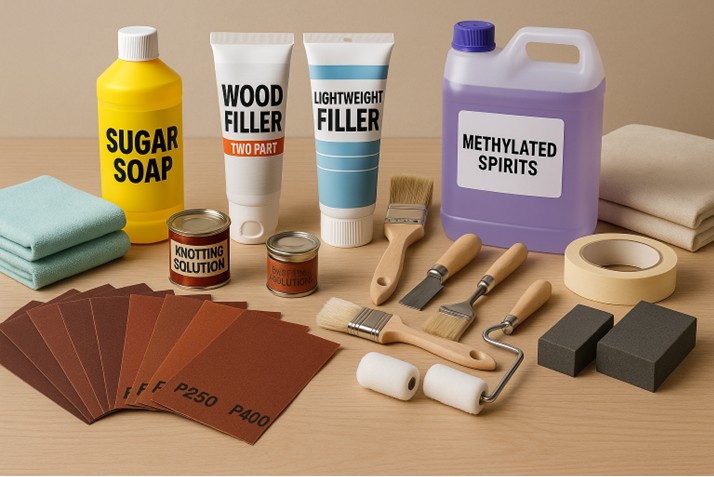
Before beginning your woodwork painting preparation, assembling the correct tools ensures efficiency and quality results. Essential equipment includes various grades of sandpaper (P120 through P400), sugar soap for cleaning, microfibre cloths, dust sheets, masking tape, and quality brushes or mini-rollers.
Selecting Appropriate Materials
Furthermore, choosing suitable materials significantly impacts your project’s success. Two-part filler works best for deep repairs, whilst lightweight filler handles surface imperfections effectively. Additionally, knotting solution or shellac primer prevents resin bleeding, and adhesion primer becomes necessary when switching from oil-based to water-based paints.
Surface Assessment and Planning
Evaluating Existing Conditions
Initially, examine your woodwork thoroughly to identify problem areas requiring attention. Look for loose or flaking paint, cracks, dents, holes, and areas where previous filler has failed. Moreover, assess whether you’re working with bare timber, previously painted surfaces, or a combination of both conditions.
Developing a Strategic Approach
Subsequently, create a systematic plan that addresses each identified issue methodically. Prioritise repairs that require drying time, such as filling deep holes with two-part filler. Also, determine whether your woodwork painting preparation requires spot-priming or full surface priming based on the existing finish.
Initial Cleaning and Protection
Establishing Safe Working Conditions
Therefore, begin by removing handles, knobs, and fittings where possible to ensure complete surface access. Mask off carpets, flooring, walls, and glass using quality masking tape and dust sheets. Consequently, this protection prevents damage and contamination during the preparation process.
Deep Cleaning Techniques
Mix sugar soap solution (typically 1:10 in warm water, stronger for greasy surfaces) and wash the woodwork thoroughly. Pay particular attention to edges, corners, and frequently touched areas such as door handles and bannisters. Rinse with clean water and allow complete drying before proceeding with woodwork painting preparation.
Repair and Filling Work
Addressing Surface Damage
Carefully scrape away all loose or flaking paint using appropriate tools to avoid damaging the underlying surface. Dig out failed cracks or damaged filler completely, ensuring clean edges for new material adhesion. Hence, thorough removal prevents future coating failures and ensures long-lasting results.
Professional Filling Techniques
Apply two-part filler for substantial repairs and lightweight filler for minor surface imperfections. Once dry, sand filled areas smooth using progression from P120 to P180 grit sandpaper. Furthermore, proper filling techniques create an invisible repair that accepts paint uniformly across the entire surface.
Comprehensive Sanding Process
Preparing Previously Painted Surfaces
For existing gloss, satin, or eggshell finishes, sand the entire surface with P120-P150 grit paper to remove shine and create proper adhesion. Subsequently, refine with P180 grit sandpaper to achieve a smooth but properly keyed finish that promotes excellent paint bonding.
Bare Timber Preparation
When working with bare timber, start with P120 grit sandpaper, then finish with P150-P180 for softwood or P180-P220 for hardwood surfaces. Always sand with the grain direction where possible to avoid cross-grain scratches that show through the final coating.
Final Cleaning and Priming
Post-Sanding Cleanup
After completing all sanding operations, vacuum thoroughly using a brush attachment to remove loose debris. Wipe down with microfibre cloths, then perform a final cleaning appropriate to your chosen paint system: damp cloth for water-based paints, methylated spirits or tack cloth for oil-based systems.
Strategic Priming Application
Spot-prime all bare wood, filler, and knots using appropriate primers or knotting solution to prevent staining. If switching paint systems, apply adhesion primer to the entire surface. Moreover, proper priming creates uniform porosity and ensures consistent paint appearance across your woodwork painting preparation project.
Conclusion
Successful woodwork painting preparation requires patience, attention to detail, and systematic execution of each essential step. From initial cleaning through comprehensive sanding and strategic priming, every stage contributes to achieving professional results that enhance your property’s appearance and value.
Consequently, investing time in thorough preparation prevents common problems such as paint failure, uneven coverage, and premature deterioration. Whether tackling a single room or entire property, following these proven techniques ensures your woodwork painting preparation delivers the flawless, long-lasting finish you deserve.
Make an Enquiry
woodwork painting preparation
about woodwork painting preparation
woodwork painting preparation
about woodwork painting preparation
woodwork painting preparation
Frequently Asked Questions
How long should I wait between cleaning and sanding during woodwork painting preparation?
Allow surfaces to dry completely after cleaning, typically 2-4 hours depending on temperature and humidity levels. Wet or damp surfaces prevent effective sanding and can clog sandpaper, reducing efficiency. Therefore, ensure your woodwork feels completely dry to touch before beginning any sanding operations.
Moreover, rushing this drying period often leads to poor preparation results and potential coating failures. Adequate drying time allows sugar soap residue to evaporate completely, ensuring optimal sanding conditions and proper paint adhesion during your woodwork painting preparation project.
What type of primer should I use when switching from oil-based to water-based paints?
Use a high-quality adhesion primer specifically designed for coating compatibility when switching paint systems. These specialised primers create a bonding bridge between oil-based surfaces and water-based topcoats. Furthermore, standard primers often fail to provide adequate adhesion between different paint chemistries.
Apply adhesion primer to the entire surface, not just spot areas, to ensure uniform coating performance. This critical step in woodwork painting preparation prevents delamination and ensures your new water-based paint system bonds permanently to the existing oil-based finish.
Can I skip the undercoat stage if I’m using high-quality paint?
Even premium paints benefit from proper undercoating, particularly when covering dark colours or dramatic colour changes. Self-undercoating paints contain higher pigment levels but still require multiple coats for optimal coverage and durability. Therefore, applying separate undercoat typically produces superior results compared to relying solely on multiple topcoats.
Additionally, dedicated undercoats cost less than topcoats, making this approach more economical whilst delivering better performance. Proper undercoating during woodwork painting preparation ensures uniform colour development and maximises the lifespan of your finished coating system.
How do I prevent dust settling on wet paint during application?
Control environmental conditions by switching off fans, closing doors, and minimising foot traffic during painting operations. Damp-wipe surfaces around your work area to settle airborne dust particles before beginning paint application. Furthermore, timing your work to avoid household activities that generate dust significantly improves finish quality.
Use quality brushes and mini-rollers that minimise stippling and texture, reducing opportunities for dust adhesion. Maintaining clean working conditions throughout your woodwork painting preparation and application phases ensures professional-looking results free from embedded contaminants and surface defects.
What’s the best way to achieve razor-sharp edges around glass and adjoining surfaces?
Apply high-quality masking tape carefully, ensuring complete adhesion along edges to prevent paint bleeding underneath. Press tape edges down firmly using a plastic scraper or similar tool to create perfect seals. Subsequently, remove masking tape whilst paint remains slightly tacky to achieve clean, sharp lines.
For particularly challenging areas, consider using liquid masking products that provide superior edge definition around complex shapes. Proper masking techniques during woodwork painting preparation eliminate time-consuming touch-up work and deliver the professional appearance that distinguishes quality decorating projects.